Observable Collections and ListView in JavaFX
This post is part of the 100 Days of JavaFX Series.
In a previous example, we used a TreeView to represent our list of schema. However, our Schema model does not follow a tree-like structure.
A schema stands on its own and does not have any parents or children. Therefore, a TreeView is not the best fit to render it. Instead, we should be using a ListView.
Let’s see how we can leverage List Views with JavaFX Observable Collections.
Introduction to Observable Collections
If you are familiar with Java, you should familiar with its collection types: Set, List, Map, etc.
An Observable Collection is a collection whose changes can be listened to. In that regard, it is similar to the JavaFX properties.
- Scalar Value (String, Integer, etc. ) → Property
- Java Collection → Observable Collection (such as
ObservableList)
While you can implement listeners yourself on these collections, they also play well with some JavaFX controls such as ListView. A list view is a list of visual elements (ListCell) which is repeated based on a provided list of items.
When creating a ListView it is possible to provide a vanilla Java collection. However, you will get the most out of it by using an Observable Collection.
ObservableList<Schema> schemas = FXCollections.observableArrayList();

ListView<Schema> listView = new ListView(schemas);

// Any change you do later to the collection will be reflected in the List View
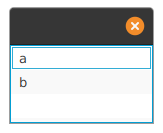
schemas.add(new Schema("a", "{}"));
schemas.add(new Schema("b", "{}"));

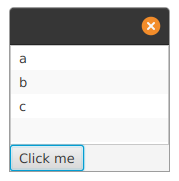
By adding a button to the schema that append a new Schema to the list, the ListView will update automatically:
Button btn = new Button("Click me");
btn.setOnAction(event -> schemas.add(new Schema("c", "{}")));

The ListView is synced with the ObservableCollection, adding a schema the observable collection make it appear in the UI.
Customize ListView rendering using ListCell and CellFactory
Each item in the list is actually a node of type ListCell. For a simple text-only cell, the ListView control takes care of it for us.
However we can take control over how each cell renders, making the ListView a very powerful component.
We want on each row:
- to show the schema name
- to show a button. When click, it’ll add “!” to the schema name
Let’s design our cell.
public class SchemaListCell extends ListCell<Schema> {

    private HBox container;
    private Label label;
    private Button button;

    public SchemaListCell() {
        label = new Label();
        button = new Button("Add !");
        container = new HBox(label, button);

        button.setOnAction(event -> {
            if(!isEmpty()) {
                Schema schema = getItem();
                schema.setName(schema.getName() + "!");
            }
        });
    }

    @Override
    protected void updateItem(Schema item, boolean empty) {
        super.updateItem(item, empty);
        if (empty) {
            label.textProperty().unbind();
            label.setText("");
        } else {
            label.textProperty().bind(item.nameProperty());
        }
        setGraphic(container);
    }
}
We have two method to look for here:
- The constructor sets up the graphical elements (Nodes) which compose the UI of the Cell.
- The update method is JavaFX telling to initialize the cell with a Schema object.
When we create a ListView, we let the control create the Cell. Whenever the ListView wants to set, change or remove a value on a ListCell object, it will call the update method.
ListView can (and will) reuse existing ListCell instances and create empty instances!
This is why on the update method and the button callback, we need to check wether this is an empty cell or not.
Lastly, we need to instruct the ListView how it should create cells. In this case we want it to use our custom SchemaListCell class.
ListView<Schema> listView = new ListView<>(schemas);
listView.setCellFactory(param -> new SchemaListCell());

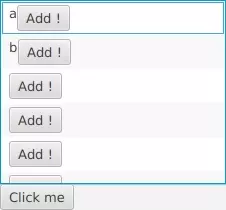
Custom List Cells playing nicely with our observable collection and databinding on the Schema name.
As highlighted earlier, we notice that indeed ListView creates empty Cell. I did not hide the button when the cell is empty to make this behaviour more apparant.